CineMatch Workflow Guide
Quick Start Method
How to perform a quick camera match with CineMatch:
- Add two clips you want to match to your timeline. Leave clips in Log, don’t apply LUTs or make other adjustments
- Add CineMatch from the Effects menu to both clips
- Under the Effects Controls, set the Source settings for each clip to match how the footage was shot
- On your first clip, leave the Target blank. On your second clip, set the Target to match the Source of your first clip
- Check the Apply REC.709 Transform box, and adjust your exposure, white balance and tint
- Use the HSL Match Refinement tool to modify specific colors which need tweaking to match the target
- Once your clips are matched, toggle off the REC.709 transform to begin your creative grade, or leave it on if you’re happy with the look
That’s it!
Full Workflow Guide
CineMatch is a set of tools designed to help you match footage shot on different cameras to a baseline technical level – a seamless, matched timeline in Log or REC.709, ready for creative grading.
The plugin fits into your existing color workflow by replacing the manual step of camera matching (or time spent hunting for the correct technical LUT for your camera), with a simple drag-and-drop application. Just tell CineMatch the settings of your source footage, and which camera you’d like to convert it to, and CineMatch handles the rest.
The CineMatch workflow includes sensor-matching technology which aligns the color values of your Log footage, RAW-like controls for exposure, white-balance and tint for applying primary corrections, and an intuitive collection of tools for final tweaks. We’ve also included False Color views to help visualize the color information in your images and guide your corrections.
While CineMatch provides extremely accurate results, it’s unlikely you’ll get a 100% perfect match just by dropping the plugin on your footage. Even with perfectly balanced footage from both cameras, differences in shooting conditions and sometimes the materials present in the scene can throw off the sensor match.
However, if you follow good shooting practices and the steps below, CineMatch will significantly speed up your workflow for matching footage from multiple sources, giving you more time to spend on the creative side of your grading.
Contents
Uninstalling the plugin and camera packs
 Shooting for the match
To ensure your best chances of getting well-matched footage, try to follow good shooting principles:
- Shoot in a Log or RAW picture style. This will maximize the dynamic range able to be captured by your camera, and give CineMatch the most data to work with. Most modern cameras and monitors will allow you to apply a display LUT to help you monitor exposure while shooting, but make sure not to bake this in to your footage
- White-balance each camera using a white or grey card. If you don’t have a white or grey card, you can use a phone app to get a light temperature reading and dial that into your camera. Ensuring your camera is capturing the correct white value for your scene’s lighting is essential. Redo your white balance at every new setup or change in lighting
- Don’t adjust too many other parameters in-camera, such as contrast or saturation. CineMatch is designed to accept the camera’s default settings, and may not be able to recover if the image recorded departs wildly from the neutral settings.
- Shoot a few seconds of a chart on both cameras. If you can get a common reference in both shots, it will give you a much better idea of what the colors looked like on the day
 Terms to know: A-Cam and b-cam footage
On most projects, you’ll have a primary or “hero” camera that will be the source of most of your footage. We call this your A-Cam footage.
Then, you will have additional “b-cam” or “b-roll” footage, shot on a second camera, drone, action cam, or archival footage.
Think about the various footage sources you have in your project, and pick which will be the “target” for your matching. Normally this will be the camera you shot on for the majority of the project, to minimize the amount of matching you have to do.
Example: if 80% of your footage is shot in S-Log3, and you have some additional V-Log footage you’d like to match, you’ll apply CineMatch to your V-Log clips, with the Source set to V-Log and the Target set to S-Log3. For other camera sources in your project, you’ll set the Source to match how the footage was shot, and the Target to S-Log3 as well.
 Selecting Source and Target Cameras
CineMatch is designed to work on Log footage straight from the camera. Don’t apply any other LUTs or corrections to the clip before CineMatch, or else the matching engine won’t be able to apply the correct transformation.
On each clip, simply tell the plugin what profile you shot in (Source) and what profile you want to convert it to (Target).
Example: to match S-Log3 SGamut.Cine footage from the Sony A73 to C-Log2 from the Canon C200, choose the following settings:
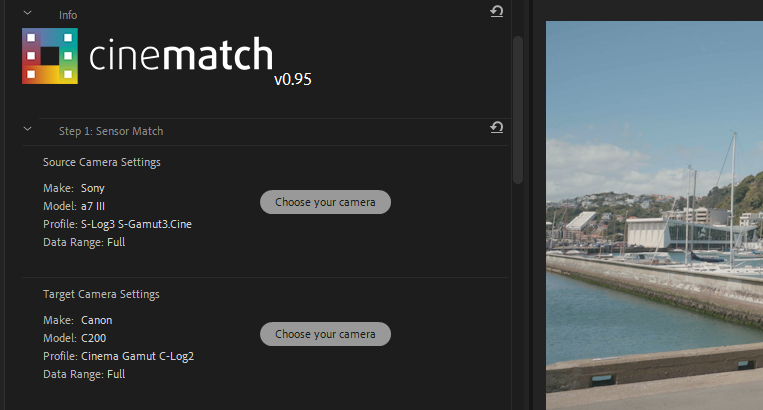
Apply CineMatch to all your b-cam clips the same way. You can copy and paste the effect, or apply it at the Master Clip level if you’ve got several instances of the clip in your project.
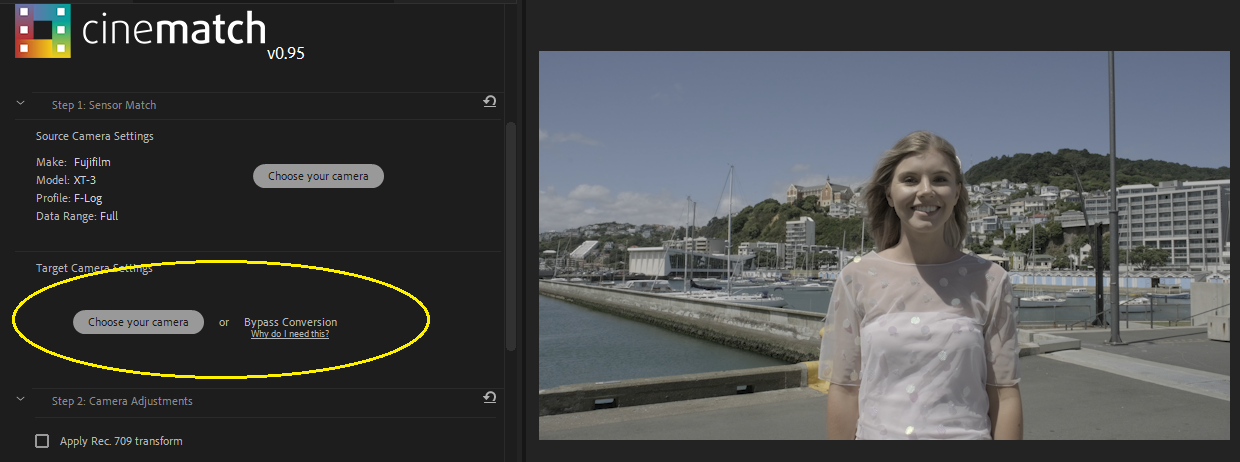
Do I need to apply CineMatch to my A-Cam footage?
We recommend adding CineMatch to your A-Cam clips as well. To do this, drag CineMatch onto the A-Cam clip, specify the Source camera settings, but leave the Target Camera Settings blank.
The Primary Corrections in CineMatch are customized to the response curve of your camera, so you will get more accurate and intuitive results with the CineMatch controls than the generic sliders in your editor.
The CineMatch controls operate on the underlying Log footage, even with the REC.709 transform applied, so you can make corrections without fear of clipping your footage.
Limited vs. Full Data Range
By default, the CineMatch profile you use will be applied using the data range native to the in-camera setting.
However, if your footage has been transcoded or recorded to an external device, this can change the data range for your footage, so CineMatch won’t interpret the footage correctly.
The Data Range tool allows you to specify the data range of your footage. If your contrast doesn’t look right after applying CineMatch and making your primary corrections, try switching the Data Range.
How do I use CineMatch with RAW footage?
If you’re starting with RAW footage (e.g. .R3Ds, BMFilm, Canon Raw Lite etc), you’ll need to debayer it to a Log source that CineMatch supports first. Consult the software provided by your camera manufacturer to debayer the footage before you apply CineMatch.
 Comparison View
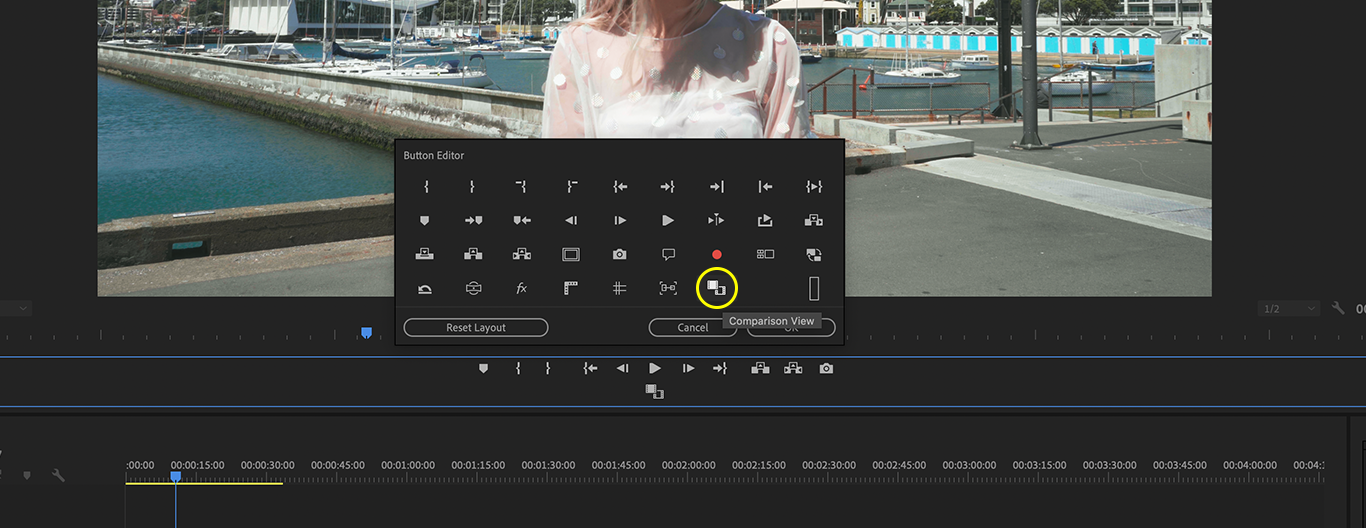
Adobe Premiere Pro provides a handy comparison view to see two clips from your timeline side by side.
To switch to Comparison View, click the Program Monitor Comparison View button, or choose Comparison View in the Program Monitor Settings menu.
Pick your reference frame by dragging on the Reference View mini-timeline, entering a specific timecode, or click Next Edit or Previous Edit.
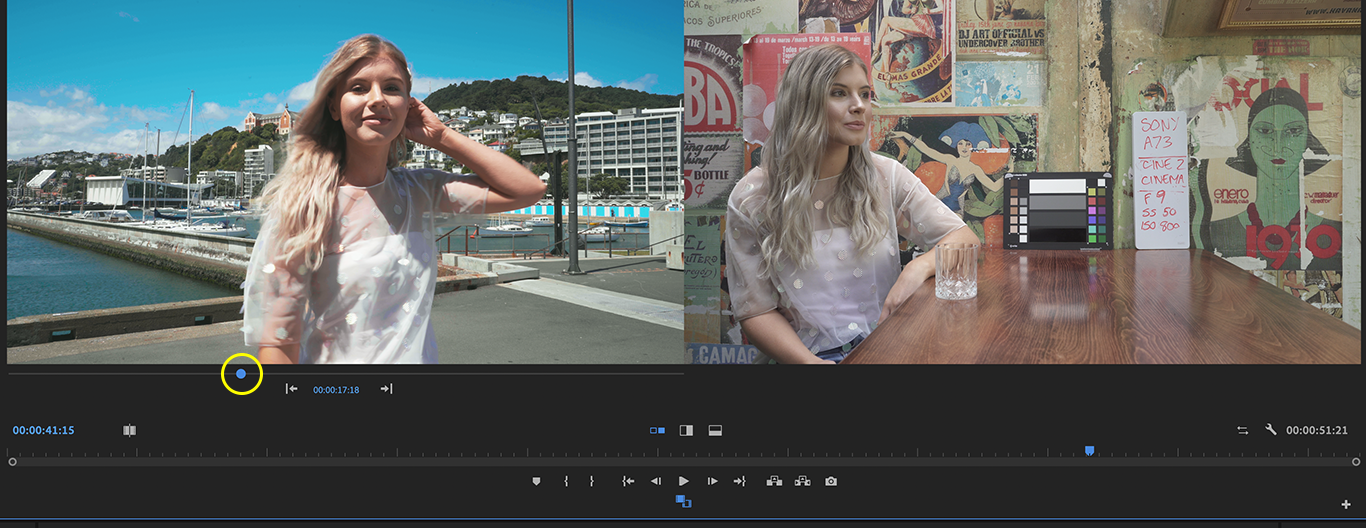
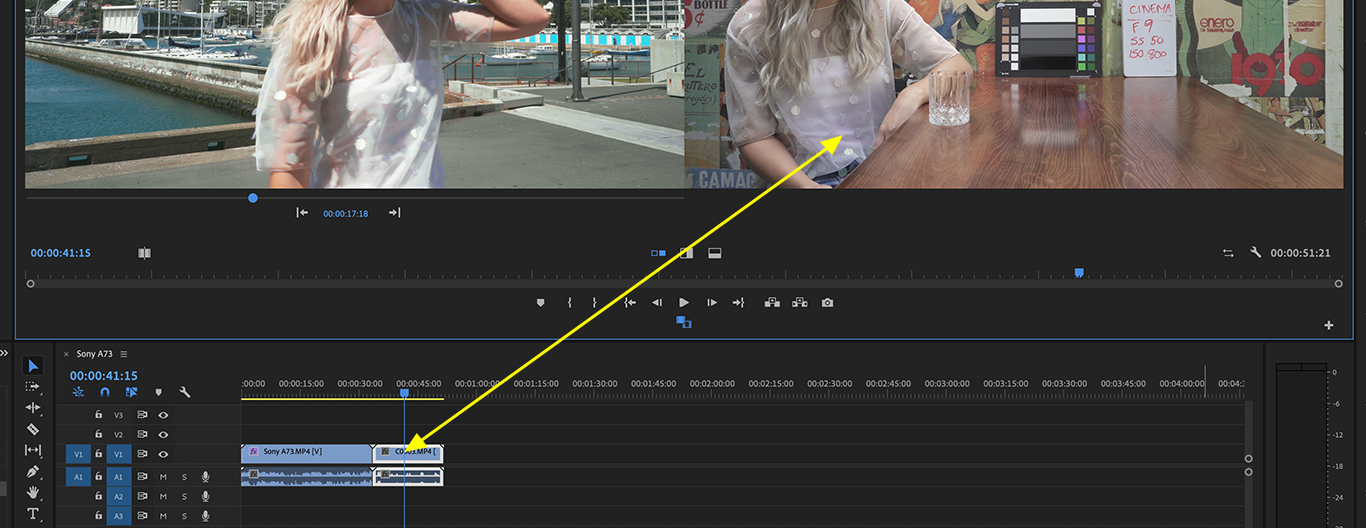
Your comparison frame will be the frame where your playhead is sitting in your sequence timeline.
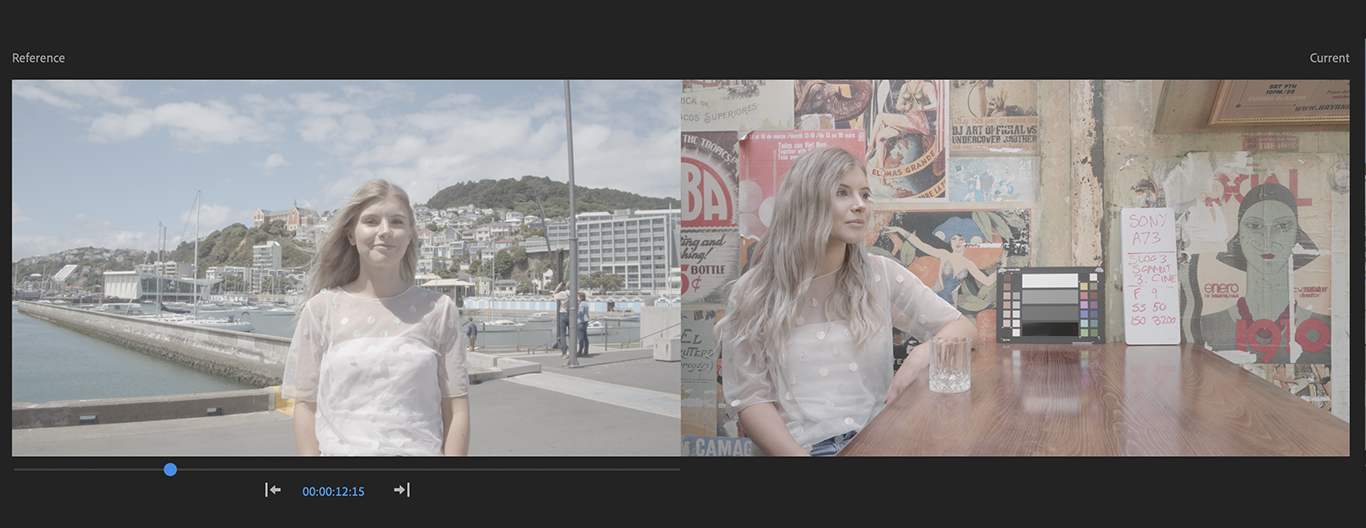
You can choose a side-by-side display, or choose the Split Vertical or Split Horizontal displays to help match a particular part of the image.
 Primary Corrections
Once you’ve applied the correct sensor settings, you will be looking at two Log images for your A-cam and b-cam clips, matched to a single Log picture style.
Exposure
Use the exposure control to match your exposure across the two shots. The slider has been mapped to your chosen camera profile, so you can adjust the exposure as if you had changed it in camera.
White Balance
Like the Exposure slider, our temperature and tint slider are also mapped to your chosen camera profile, so you can ensure that when you white-balance your footage, it will respond in the camera’s native color science.
The Auto White Balance picker will help you quickly set the white balance for your scene.
Click the Eyedropper tool by the Temp/Tint controls, and then select an area in your scene that should be neutral white. It’s best to do this after you’ve applied the camera settings, but when the footage is still in Log, so uncheck the ‘Apply REC.709’ checkbox temporarily if you have it checked. After you’ve made your Auto White Balance correction, you’ll see adjustments have been made to both the Temp and Tint sliders.
Apply REC.709 Transform
We’ve added an optional transform in the primary corrections so you can view your footage in the REC.709 color space. This view can be toggled on and off by clicking the ‘Apply REC.709 Transform’ checkbox.
This transform lets you view your footage on a REC.709 monitor, but you can still use the Primary Controls in Log so you’re not losing any color information to clipping.
Alternatively, you can leave your images in Log and use FilmConvert as an Adjustment Layer over your entire timeline for a film grade. In FilmConvert, apply the camera selection to match the target you set in CineMatch.
 False Color Guide
CineMatch includes several False Color Guides to help evaluate your images.
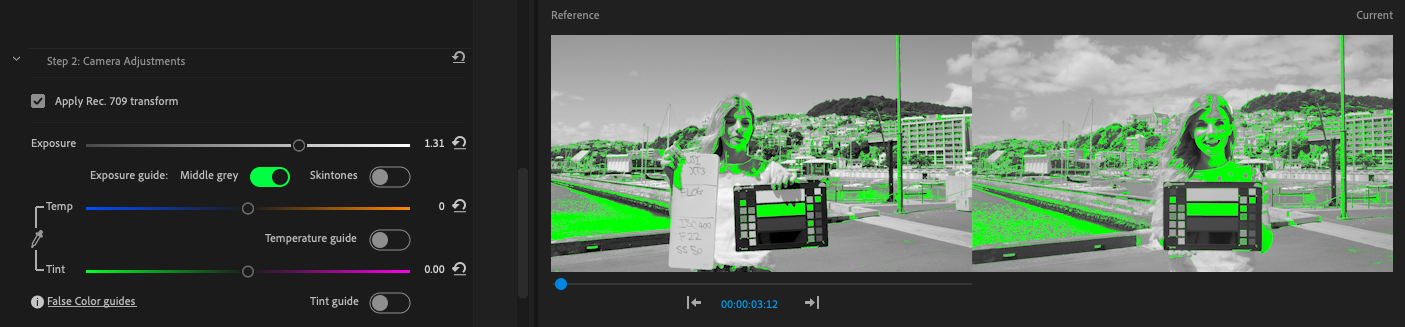
Exposure – Middle Grey
Green is mapped to the middle grey range for REC.709. Pick the area of the image you would like to expose in the mid-range, and with the false color applied, move the exposure slider until this area appears green.
In Comparison View, adjust the exposure in both shots so that the green lines up in the same area. This will ensure that area is exposed at the same level.
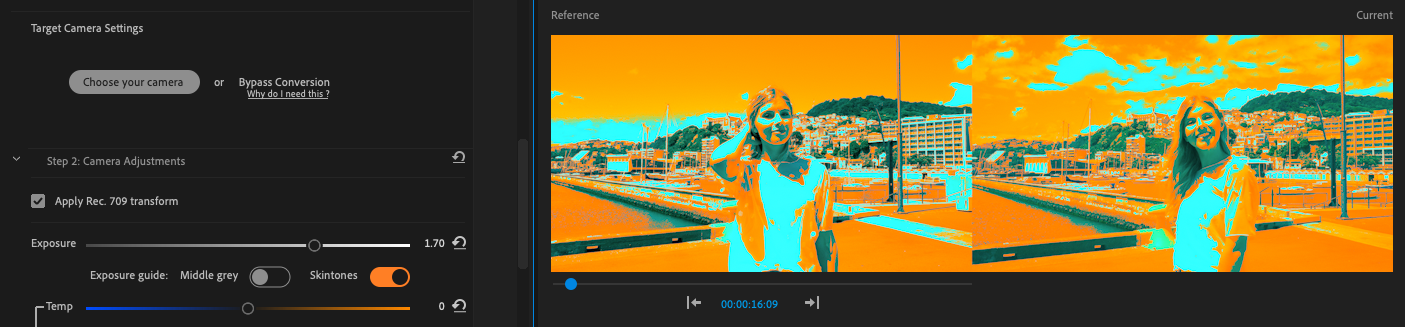
Exposure – Skin tones
This False Color view maps orange to a common exposure for skin tones in REC.709. Identify the area of a subject’s face that you want to expose correctly, apply the false color, and adjust the exposure slider until the skin is orange. This will also work in Comparison View if you have two shots of a face that you want to quickly match in exposure.
Temperature
This has been designed to help you visualize where the balance in temperature lies within your image. All warm elements are mapped to orange and all cool elements are mapped to blue. To ensure an element in your scene is a neutral color, adjust the temperature slider until it displays as grey.
This also works in Comparison View to quickly identify if two shots are balanced with each other.

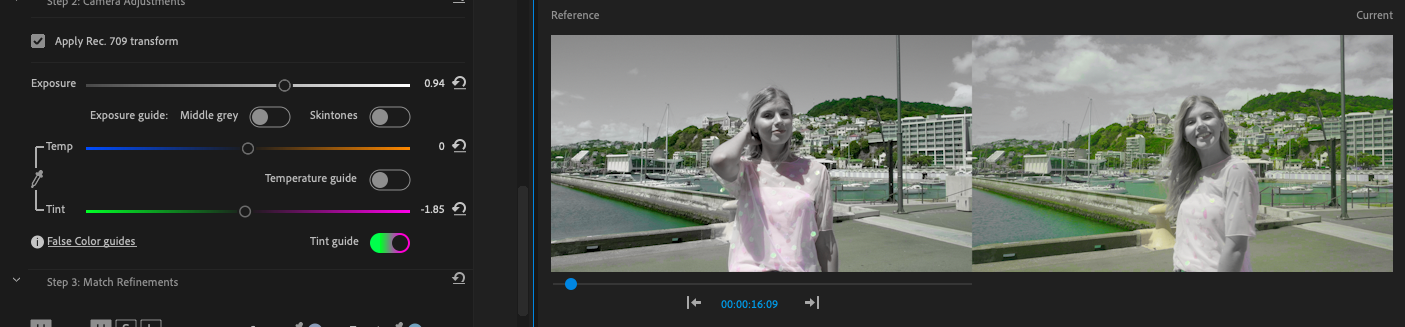
Tint
This false color guide shows all of the green and magenta elements of your image. Like the Temperature false color, you should identify a part of your image that you would like to be neutral and move the tint slider until that is area is grey. This also can be used in Comparison View to quickly identify if your shots are balanced with each other.
 Using scopes for camera matching
Scopes are a powerful tool for visualizing the color and light information in your images.
Scopes work by plotting the visual pixel information from your footage numerically, so you can “read” the image the way you would read a chart or graph.
Scopes can help you analyze particular issues or aspects of a picture, and are very helpful for camera matching, as you can often see differences on scopes that will be hard to spot on the program monitor.
Scopes can also be used when you’re using Comparison View, so you can analyze the color information in both images simultaneously – perfect for balancing exposure, white points and color temperature.
Below are descriptions of the three main scopes that will be helpful for camera matching. For more information on reading scopes, check out Ollie Kenchington’s Introduction to Scopes article on the FilmConvert Color Hub.
Turning on Scopes in Adobe Premiere Pro
Enable the Lumetri Scopes by switching to the Color workspace in Premiere Pro, or dragging the Lumetri Scopes panel to a convenient section of your window.
Change the Scope view by clicking on the Spanner icon.
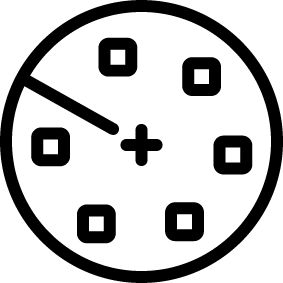
Luma Waveform
The Luma Waveform plots the luminance (or brightness) of the pixels in your image, with the brightest at the top and the darkest at the bottom. If the Luma Waveform shows a big cluster of information towards the top of the waveform, it means a lot of your picture contains very bright pixels.
When you use the Exposure control, you will see the entire Luma Waveform shift up and down as you make pixels brighter or darker.
You can align the luminance values of specific ranges in your image (highlights, midtones and shadows) using the Curve controls, Levels, or the sliders underneath each Color Wheel.
For camera-matching, try to match the white point and black point of your images by making sure they hit around the same point on the waveform. Then identify the key part of the image that needs to be the same exposure (e.g. a person’s face) and adjust the Midtone range so those areas hit the same point on the waveform.
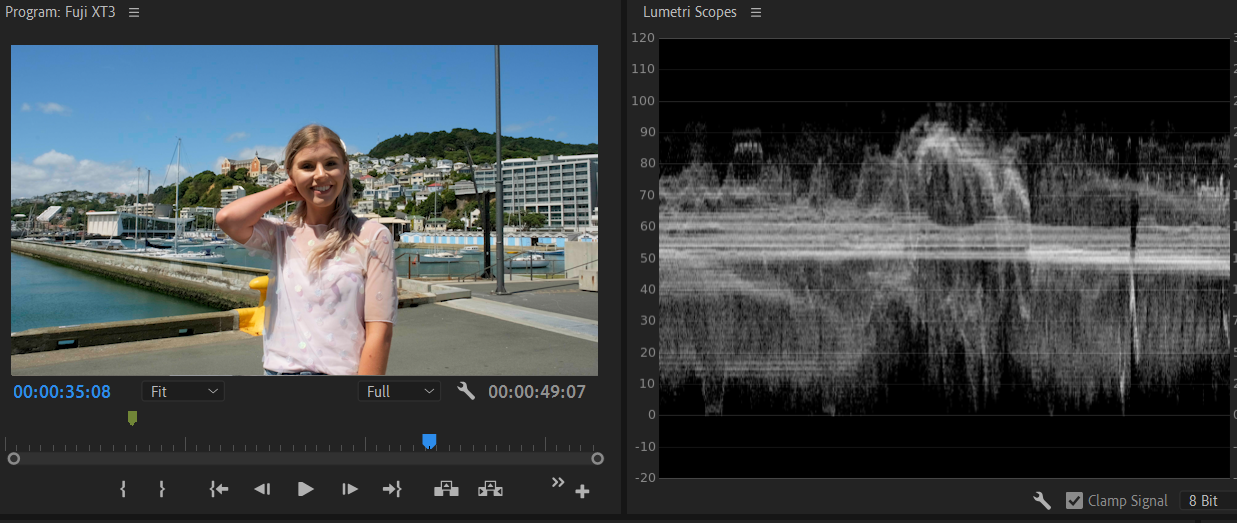
RGB Parade
The RGB Parade is similar to the Luma Waveform, but it splits the luminance information into 3 channels – red, green and blue. When the 3 channels are at equal levels in the waveform, you know you have a neutral white balance.
If one channel is higher than the others, you know that color is brighter in your image. You can use the White Balance and Tint sliders, and the Color Wheels in the Secondary Controls, to adjust the balance between the three channels to make sure your images have a similar color balance.
Example: if the image you are matching to has a large amount of blue in the shadows (represented by a strong concentration of blue at the bottom of the Blue channel), make sure the image you’re matching has the same distribution.
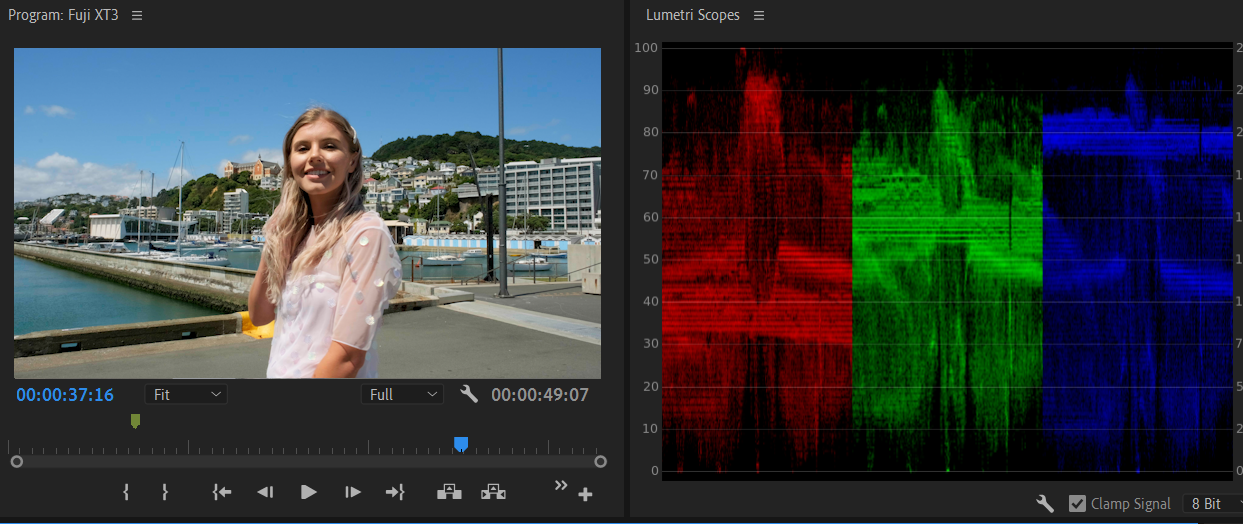
YUV Vectorscope
The YUV vectorscope is a circular plot of the hue and saturation values in your image. Around the edge of the circle are boxes which represent the primary colors. Lines extend from the centre of the circle to edges – the closer to the edge, the more saturated that color is in the image.
The vectorscope also contains a helpful skintone indicator. You can use this line to help align the skintone of your subject on both A-Cam and b-cam clips to ensure you have well-matched colors. Use the mask tool in Premiere to create a temporary mask on a person’s face to see clearly on the vectorscope where the skin falls on the hue line.
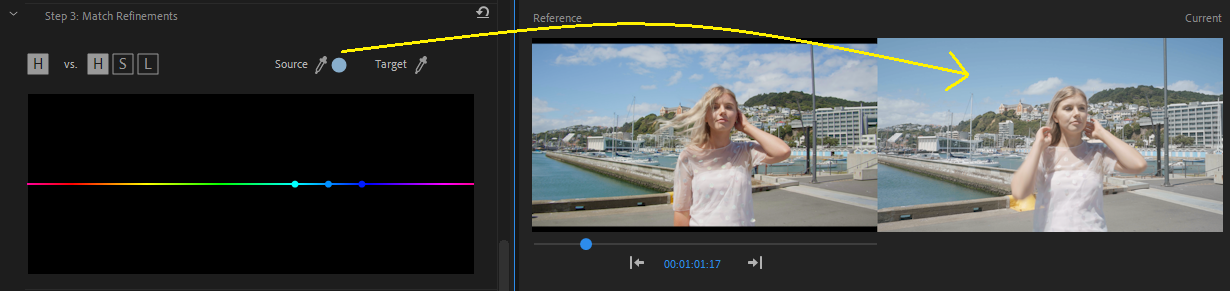
H/S/L Match Refinement
The HSL tools are designed to help you correct for any differences in your scene that the sensor match cannot accommodate. Most commonly, this will be differences introduced by a lens or the shooting conditions on the day.
Switch to Comparison View so you can see an example of the color in both images that you would like to tweak.
Use the Source eyedropper to select the color in the image you wish to adjust. This will create 3 points on the color curve to show you the color you’ve selected.
Use the Target eyedropper to select the color you would like to match to. The HSL tool will automatically try to align these two colors using Hue and Saturation.
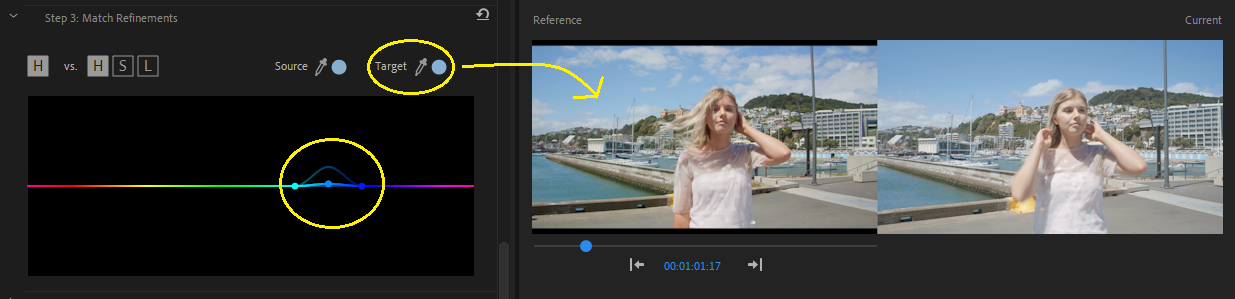
You can refine the adjustment by clicking on the curve points and dragging them around to reshape the curve. The colors on the axes will show you the direction of your adjustments.
The dimmed line will show what changes have been made on the other two curves not currently selected.
There are 3 curves you can adjust – Hue vs. Hue, Hue vs. Saturation, and Hue vs. Lightness. Click the letter icon to switch between the different curves.
Hold down the Shift key to lock your adjustment to the vertical axis.
To remove a point on the curve, double-click the point. You can reset all the points on the curve with the Reset button.
 Secondary Color Corrections
After Sensor Match and Primary Corrections, you should be in good shape with your match. CineMatch provides several tools for tweaking your image further.
Color wheels allow you add more of a particular hue to the Shadows, Midtones and Highlights of an image. Use color wheels to neutralize a color cast in the shadows or highlights, or adjust skin tone in the mids.
The Saturation slider modifies the overall saturation of your image.
The Curves control allows you to modify the brightness and contrast of your image by plotting the brightness of individual color bands. Click to add points on the curve – dragging downwards will darken that image represented by the curve, pushing the point up will brighten it.
The Levels histogram plots the light values of your image horizontally so you can see the distribution from dark to light. Adjust the handles to change the white point, black point and midpoint of your image.
 Uninstalling the plugin and camera packs
Mac OS
To remove the plugin from Mac OS, you’ll need to manually delete the files from your machine using the Finder.
The CineMatch plugin is located below:
Macintosh HD/Library/Application Support/CineMatch
Windows
To remove the plugin from a Windows machine:
- Select the Start button
- Select Settings > Apps > Apps & features
- Select CineMatch from the list of programs on your machine and select Uninstall